I recently purchased a Raspberry Pi B+ and started setting it up. First I downloaded NOOBS from the Raspberry Pi site, I decided to use NOOBS because it is easier than putting a raspbian image on the sd card. From there I was able to install the OS with no problems.
Networking
Next was setting up the internet access so that I could update, install, and most importantly ssh. I bought a kit for the Pi so it came with a case and a usb WiFi adapter so I needed to set that up.
First step is to start the Pi without the WiFi adapter plugged in. Then edit the interfaces file. Just use nano like this:
sudo nano /etc/network/interfacesThen changed the file to look like this:
auto lo

iface lo inet loopback
iface wlan0 inet dhcp

allow-hotplug wlan0
auto wlan0

iface wlan0 inet dhcp
  wpa-ssid "Your network name"
  wpa-psk "Your network password"
If you are unfamiliar with nano you then use C-X (ctrl-x) to exit and Y to save the changes to the file. Then you can restart your Pi with the WiFi adapter and it will be running! You can test this with ifconfig which should show your ip address. Also ping www.google.com -c 3 should return without any errors.
A Static IP Address
Next I wanted to make sure that my pi would be using the same ip address whenever I restarted/moved it. This was easy too, but means going back to the interfaces file. Before we do that we will need to grab some info from your pi. First do an ifconfig to get an output like this: (It will look slightly different with a wired connection)
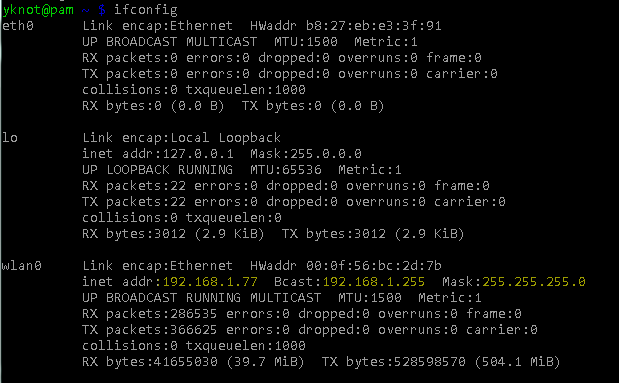
From this output we want to grab your ip address "192.168.1.77", broadcast "192.168.1.255", and mask "255.255.255.0" highlighted above. Those are just my values and you can change the ip address to be what you want your static ip to be. Then run netstat -nr to get the rest of the values

from this grab the network or destination "192.168.1.0" and the gateway "192.168.1.1" highlighted above. Now we are ready to edit the interfaces file again using nano. This time the file should look like this: (wlan0 if using wifi eth0 if using wired)
auto lo

iface lo inet loopback
iface wlan0 inet static
address 192.168.1.77
netmask 255.255.255.0
network 192.168.1.0
broadcast 192.168.1.255
gateway 192.168.1.1

allow-hotplug wlan0
auto wlan0

iface wlan0 inet dhcp
  wpa-ssid "Your network name"
  wpa-psk "Your network password"
And there you go you should be able to restart your pi and connect via the ip address you set as your static ip. You can do a quick ifconfig to check that this is in fact true.
Further Pi Projects
I do plan on doing more things with the pi than just setting up ssh (obviously) and will post updates on any projects I think might be useful to anyone else. Also I would like to add a link to this page for the help with setting up the static ip. That is something I always struggle with when setting up my xbmcuntu servers. Hopefully this guide will help me to remember next time!